How To Increase Bluestacks RAM Size ?
Contents
Are you irritated with slow speed of Bluestacks? Don’t worry, here is How to Increase Bluestacks RAM Size. You can easily increase Bluestacks Android emulator RAM by following this simple tutorial. BlueStacks is the best Android emulator for Windows. We can use our any Android apps on PC by using Bulestacks. We are able to use Whatsapp, Hike, Instagram or any other apps or games on our windows PC by using Bluestacks. But one of the main problem faced by every user od this emulator is it’s RAM size. It only works on small size of RAM, so it won’t works with speed. But you can easily increase RAM in Bluestacks app player using this guide. Bluestacks is the android emulator which allows users to install and run any android app in it.
If you have no Android mobile and wants to use Whatsapp, as it’s only available for android so many people can’t able to use Whatsapp because they don’t have an Android phone. Now what to do for using Whatsapp messenger?, Here is the best solution of this problem. Yes!! off course that’s is Bluestacks App Player. By installing any Android emulator on your Computer, you are able to install and run any Android app on your PC.
But when we install and use Bluestacks on our PC, it will works too slow and it takes something 5 minutes in starting. So we feels tired by using Bluestacks just because it works slow. But do you know Why Bluestacks works too slow? If no then let me explain reason behind it. Actually Bluestacks is an android emulator which acts like and Android mobile and it have all features which a normal Android mobile have, so it also needs RAM like and Android phone to work. But that’s not a gadget that’s why there is no RAM available in Bluestacks, so it share’s our PC’s RAM to run itself. Bluestacks only shares something 700MB RAM of your PC, that’s why it worls too slow. It have default settings so it only share 700MB RAM from your Computer’s RAM. But it is possible to increase Bluestacks RAM.

You don’t need any type of Other software to increase RAM of Bluestacks App Player Android Emulator, it can be easily done from your PC. In this article I am going to describing trick to increase RAM of Bluestacks to make it run fast. Just follow the steps given below to increase Bluestacks RAM. You can increase RAM according to your need, but your PC’s also must have at least 4GB RAM so that it can share its RAM with Bluestacks smoothly. If your PC have too low RAM like 1GB or 2GB, then don’t follow these steps otherwise your PC will also works too slow after increasing Bluestacks RAM.
Must Read:- Best WiFi Names
What Is Bluestacks ?
Bluestacks App Player is an Android emulator which turns your PC into an Android device. After installing Bluestacks on your Computer, you are able to install and run any Android app on your PC. You don’t need to use Android phone for using Whatsapp while you are using Laptop or PC to access Whatsapp messages because with the help of Bluestacks, you are able to use any Android app on your PC.
Why You Needs To Increase RAM In BlueStacks ?
Actually BlueStacks isn’t a gadget like and Android phone so it is less with some parts of Android phone like it don’t Have any Battery, RAM, etc. But our Android mobile needs Battery, RAM and all. So BlueStacks share these pasrts of our Computer (PC). It shares our PC’s RAM and run itself. But it only takes something 700MB of our Pc’s RAM that’s why it works too slow. So we needs to increase size of BlueStacks RAM. In this article I am going to sharing method to increase RAM size in BlueStacks.
Must Read:- How To Access Blocked Websites On PC
How To Increase Size Of RAM In Bluestacks App Player :
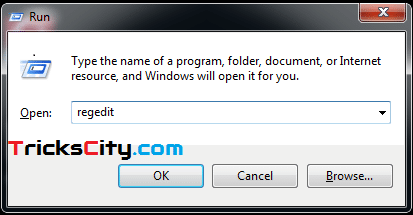
1) First of all press WinKey+R from your kryboard.
2) Type regedit and press OK.
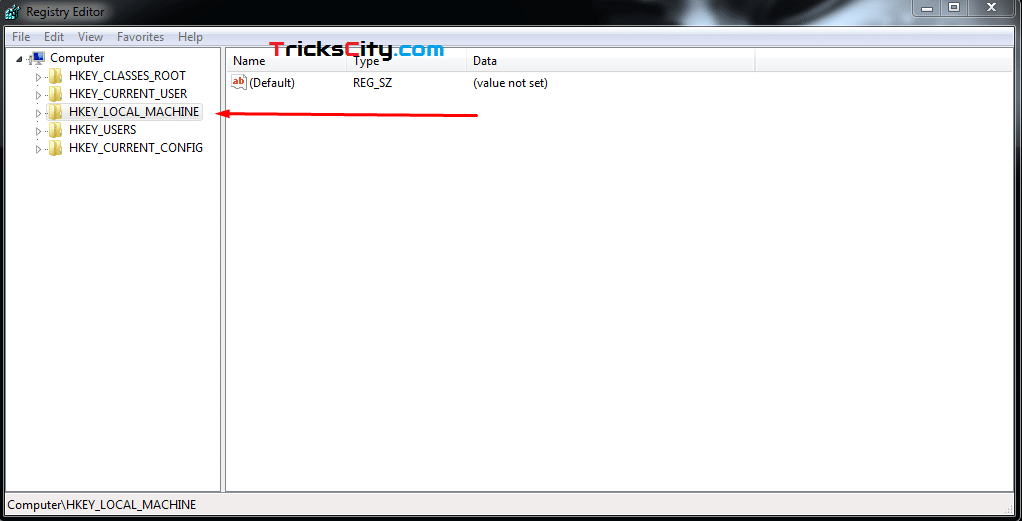
3) Now one list will appear on screen, click on HKEY_LOCAL_MACHINE from the list.
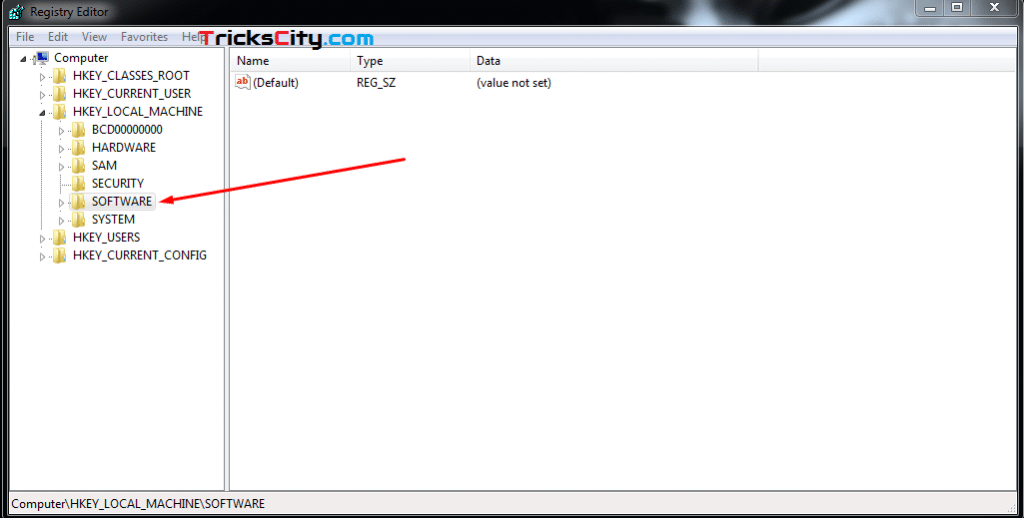
4) Then another list will appear, now click on SOFTWARE from the list.
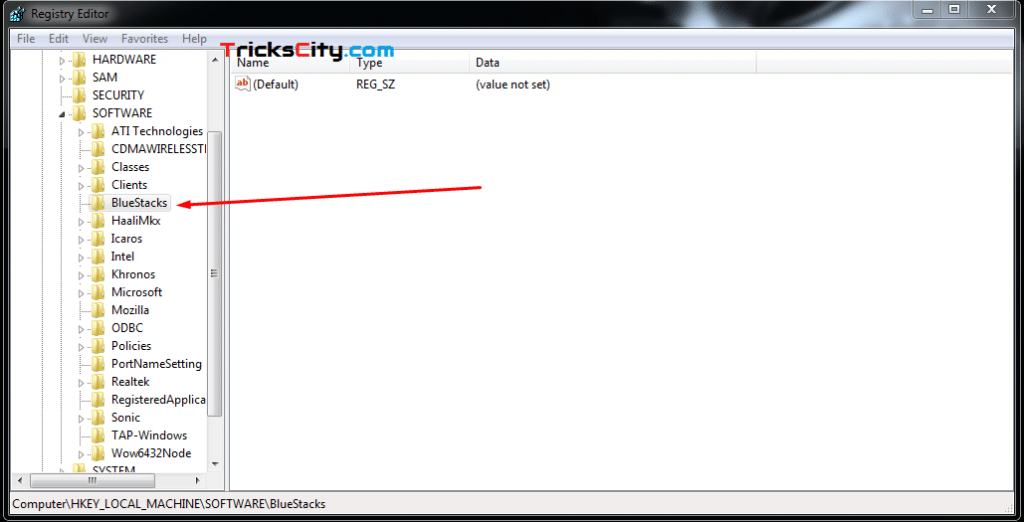
5) Search and click on BlueStacks from the Software’s list.
6) Noe click on Guests and then click on Android from BlueStacks list.
7) This time another list will appear in Right column in which you will see the file called Memory, click on it.

8) Double click on Memory and change its Base from Hexadecimal to Decimal.
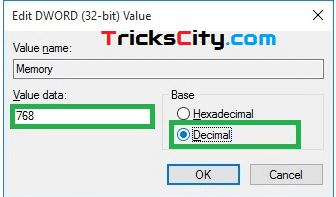
9) Now you can change your RAM’s size from left side, its default size is 768MB, you can increase it according to your need.
10) Done, that’s the method to increase size of RAM in Bluestacks.
Now if your PC works too slow after increasing BlueStacks’s RAM, you can also able decrease its RAM by following same steps again.
Must Read:- How to Hack Any WiFi Using Andorid
Final Words
So friends this is an article about how to increase size of RAM in BlueStacks?. I am describes step by step guide to increase Bluestacks RAM in this article by which you can easily increase BlueStacks RAM to run it more faster than before. You don’t need to install any external software like BlueStacks Tweaker or anything to increase BlueStacks App Player’s RAM, it can easily done manually from your system. I hope my article is helpful for you. If you have any doubt or query, feel free to comment below. I will reply you shortly.
Just now followed your steps to allocate almost 4000 mb memory to my BlueStacks….and I own only 4 gb ram… however, BlueStacks doesn’t show increased ram…still shows almost 2gb…whats6wrong…??
It depends on how much GB RAM your PC ( Laptop) have. If your computer has only 4GB RAM all over then you can use up to 3GB on Bluestacks. If you are willing to use all 4GB to Bluestacks then your computer will start working slow and it can also lag because you have used all RAM in emulator.